Having these preinstalled makes Kali Linux a true penetration testing platform for the security engineer. Tools are categorized as follows:-
Information Gathering Sniffing & Spoofing Vulnerability Analysis Exploitation Tools Password Attacks Wireless Attacks Forensic Tools Maintaining Access Hardware Hacking Web Applications Stress Testing Reverse Engineering Reporting Tools
To see a complete list of tools – click here In this article, I will explain how to install Kali Linux on VMWare Fusion.
Installation Requirements
Disk Space – Minimum 10 GB Architecture – i386 or adm64 RAM – Minimum 512 MB
Download Kali Linux ISO File
Download the necessary ISO file from the official download page. For this demo, I have installed it as highlighted below.
Its more than 3 GB so based on the Internet speed, it may take a few minutes.
Installing Kali Linux
This assumes you have download kali-linux-2.0-amd64.iso and ready to install Kali Linux.
Open VMWare Fusion on your PC (I am using MAC in this demo) Click on Add icon and New
Select the installation method as “Install from disk or image” and click on Continue
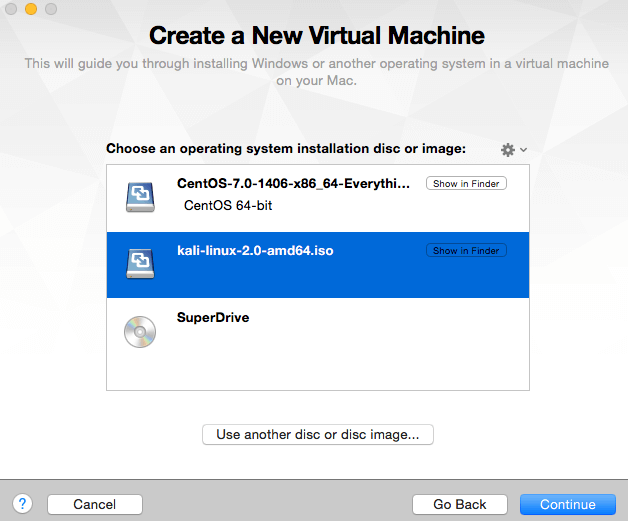
Click on “Use another disc or disc image” and locate the downloaded iso file. It will appear in the list as shown below, click on Continue
Select Other » Other 64-bit and click on Continue
Here you will notice, I have hard disk capacity is 8 GB but the minimum requirement to install 10 GB so I will go to customize Settings and increase the hard disk space.
Click on Customize Settings Enter the name and save it
Click on “Hard Disk (IDE)
I will increase to 15 GB and click on Apply
Click on the Play button to begin the installation
You will be greeted with the following screen when I will select “Graphical Install” and press enter to proceed with the installation
Select the language and click on Continue
Select the location then continue
Configure the keyboard to be used and click on continue
Select the ethernet to be used. As I am using VMWare on MAC, I will be sharing with MAC ethernet so selected “no ethernet card” and click on Continue
You will get a notification that “No network interface detected” but that’s fine. Click on continue
Enter the Hostname and continue
Enter the root password and click on Continue
Select “Guided- user entire disk” and click on Continue
You will get partition disk information that will data will be erased but that’s ok because there is nothing at the moment. Click on continue
Select the partition as “all files in one partition (recommended for new users) and continue
Confirmation before installation start writing changes to disk, click on continue
Select “Yes” on final confirmation and click on continue
It will take a few minutes to install the Kali Linux and during installation, you may see the following progress bar
It will prompt you to configure the package manager but I will proceed with no to keep the installation procedure simple.
Select Yes to install the GRUB boot loader on the hard disk and continue
Select the disk to make it bootable and click on Continue
And finally, you will have an “Installation Complete” message. Click on continue
It will take few seconds will boot the Kali Linux and give you a login screen as below.
Enter the password, which you configured during installation and you will see the first screen as shown below.
Woah! It’s a bit long, isn’t it? Well, worth it! So this was the installation guide, and I hope it helps you to install Kali Linux on PC or macOS using VMware fusion and all of you to explore. If you are a beginner, I would recommend taking this Kali Linux tutorial.


